Since those fateful days last fall...I have pretty much had that heat tool in my hand EVERY TIME I create! I LOVE embossing! I haven't really added that many powders to my collection (other than Distress Embossing Powders...more on that later tonight). I RARELY, if ever, use much beyond the clear and white...the glitter...I'm still not much more than an utter failure of EVER getting those to anything other than burn...
One of my favorite things to do with heat embossing is to emboss one image over another embossed image...gives a really nice layering...and you can "shadow" them...or give the impression of depth with one behind the other. Another fun thing to do is start out with a plain tag or card...emboss with white or clear...and then ink on top...the embossing resists the ink, you just wipe off your embossed image and it shows beautifully! I have some pics of stuff I have done with that and I'll try to show you some later.
Anyways...here is a recent card I created that was meant to highlight some embossing. It's the current card challenge over at If the shoe fits... (check it out if you haven't already). I wanted to play around and try something a little different. So I applied some Glimmer Mist directly to my Embossing Folder and then ran the paper through...thankfully the folder cleans up very easily! I was surprised with how it came out, and will probably use this technique again...gives your paper some nice color...and since it's Glimmer Mist...some nice shimmer as well.
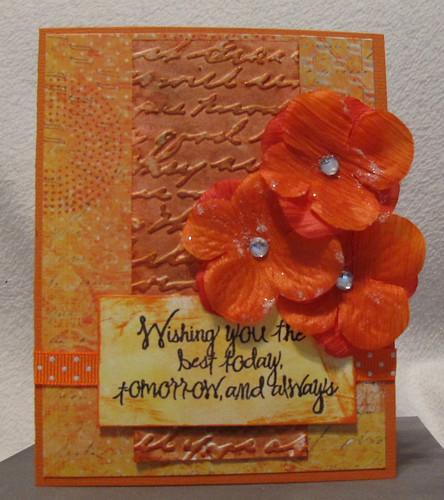
Supplies:
- Cardstock: American Crafts and Georgia Pacific
- Paper: K&Co Que Sera Sera
- Ink: Ranger Distress Inks - Walnut Stain and Spiced Marmalade
- Sentiment: CTMH - Curly Sentiments
- Tattered Angels: Glimmer Mist - Tiger Lily
- Ribbon: Dashes, Dots and Checks (Michaels)
- Flowers: Autumn Leaves Pretty Poppies
- Cuttlebug: Script Embossing Folder
Love this card Les! The color is so "pop-py" and happy! Reminds me of you in a way :)
ReplyDelete